Table of Contents
Macrame Tutorial: DIY Macrame – Reverse/Different Knot Patterns!
The knotting techniques used to create macramé are as old as textiles themselves. These crafts are based on ancient traditions that have been passed down for centuries. A popular macramé strand can be as large as 100 feet. Whether it’s a necklace or a bracelet, macramé is an excellent way to express yourself and your unique personality. Here are some ways to make your own macramé: –
Wooden beads are a great choice when starting out with macrame. Obviously, wooden beads are a traditional choice, but other kinds of beads will also look great in your macrame designs. You’ll need a hole big enough to accommodate your cords. Other types of beads can be used as well, but it’s a good idea to keep in mind that the larger the piece, the more expensive it will be.
Alternatively, macrame can be dyed. To dye macrame, simply soak it in fabric dye and wait until it dries. Depending on your preferences, the dye can take anywhere from twenty to forty minutes. Make sure to have plenty of space to hang the piece as it will dry quickly. If you want to use your macrame creation immediately, make sure that the materials are completely dry before using them. You can also reuse macrame after you’ve finished.
To dye your macrame, you need to have a large enough hole for the cords. You can also dye your cord by applying fabric dye directly to the fibers. You’ll need to soak it for at least 20 minutes, but you can experiment with different colors until you’ve got the right shade and intensity. Then, you can start making your macrame pieces! Then, you can make more unique macrame pieces and wear them as accessories.
Macrame is an ancient art that was first recorded as early as the third century BC. Originally, the technique was used to hang pots. Today, macrame is used to create decorative objects and jewelry, but the knots are also used to make macrame crafts. This art can be made with small amounts of materials and can be easily replicated in other crafts as well. If you can’t afford to spend the time and money on materials for your macrame project, you can try experimenting with small projects and try your hand at a new skill!

There are a lot of ways to learn macrame. There are many books and resources to help you. Besides books, you can also find videos online. You can find videos from macrame artisans, as well as free tutorials. You can also learn to braid your own cord and make your own jewelry. There are also many online classes and online courses available, and you can even get tips from other macrame enthusiasts. You can share your project on social media sites.
While macrame is an ancient art form, it has recently been re-emerged in the fashion world as a luxury craft. Today, macrame is made with leather, soft cotton strings, and even some other materials. There are only a few tools needed for this craft, though, including a cloth rail. During a beginner’s first project, use only five to six cords, so that you don’t waste any materials.
The length of your finished macrame project will depend on the cords you choose and the knots you tie. It is important to note that different people will knot cords with different tensions, which will affect the final size of the piece. Always measure the piece you’re making before you start it. If necessary, you can adjust the knots to make the project fit your specifications. In addition to the length of the macrame cord, it is important to choose the right materials for the project.
The technique of macrame is an intricate and beautiful art that has a long history. The technique has been used for centuries and is widely known. The craft was popularized in the 1970s when sailors made tassels for their clothing. Nowadays, macrame is a popular decorative element in women’s clothing. Throughout the centuries, it has been used to make bracelets, belts, and tassels.
Materials:
– 5mm Super Soft String (Colour: Natural)
– 5mm Recycled String (Colours: Sage and Vintage Green)Let’s get started:
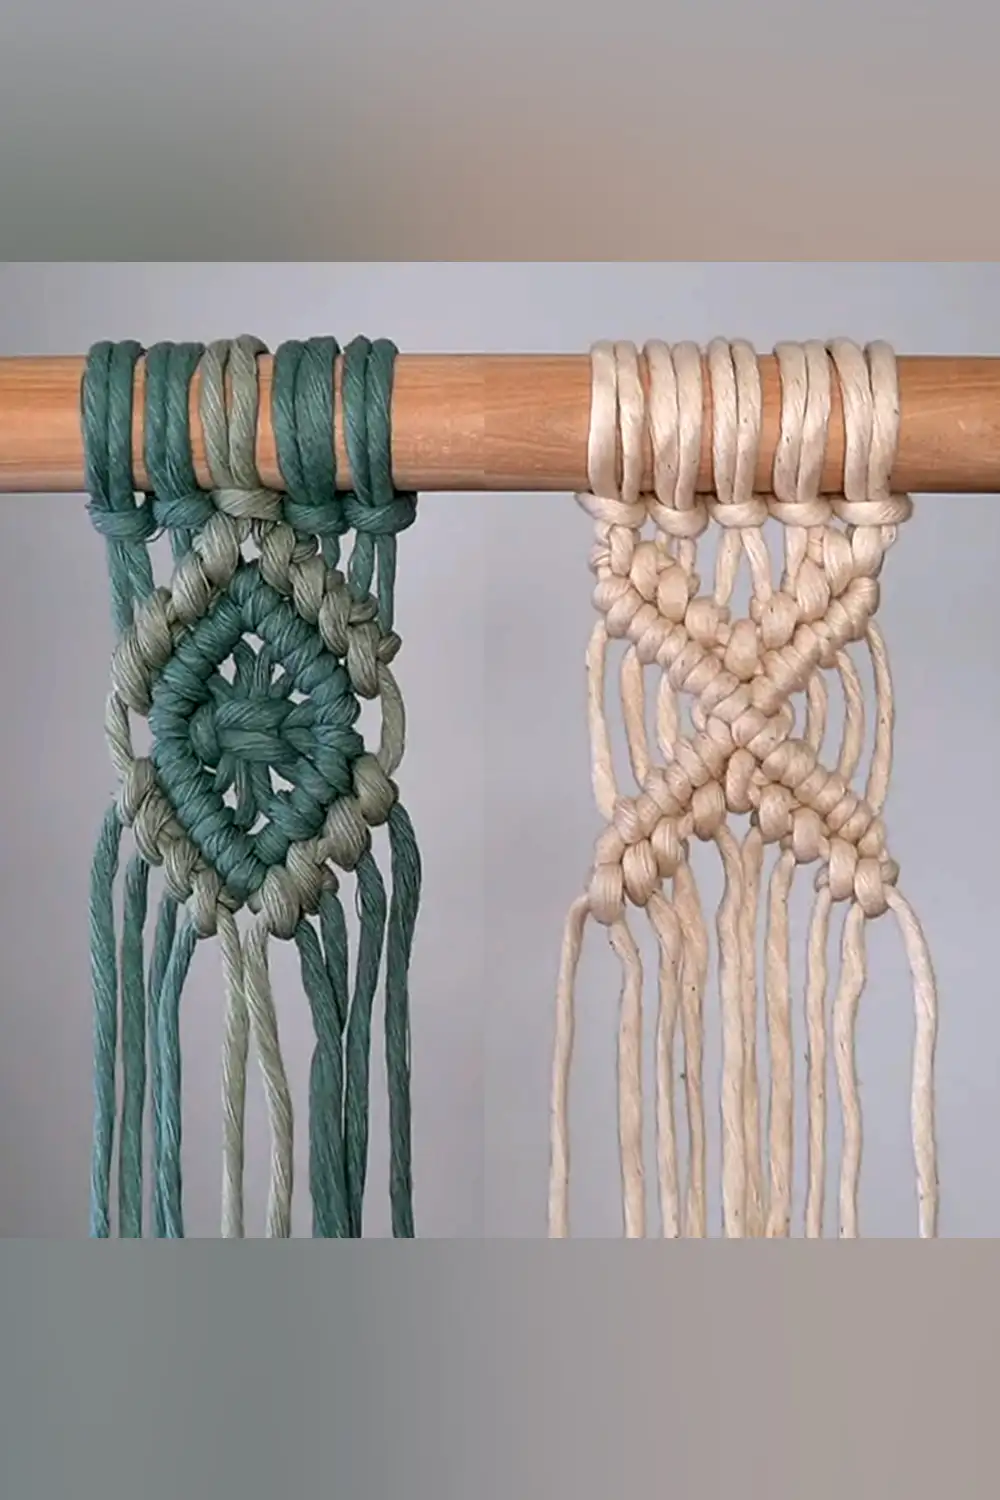
Pattern 1: X Pattern
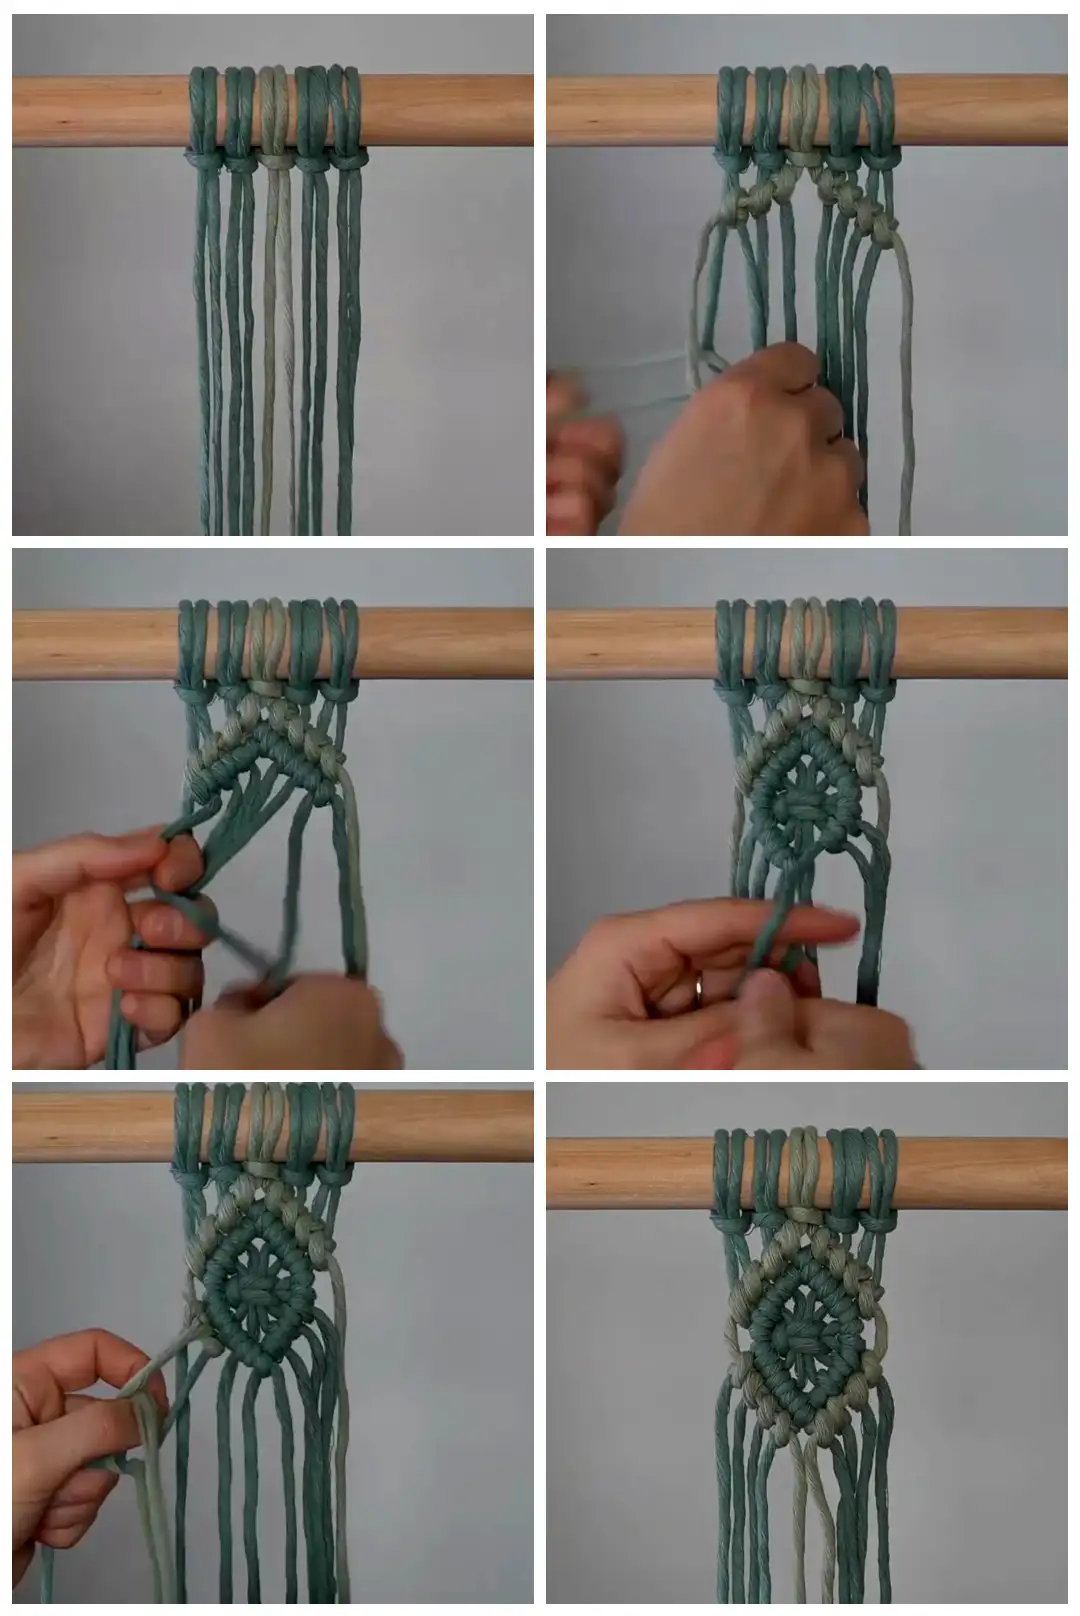
We will start with the X pattern. Cut 5 pieces of 5mm natural string, each piece is 6 ft in length. Fold each piece in half and attach to your dowel using Lark’s Head knots. Use the outside left cord as your working cord and tie 4 reverse dhhks working down and to the right. Repeat on the right side of your work. Tie one more reverse dhhk in the middle of your work.
Use the outside left cord as your filler cord and tie 4 dhhks underneath the previous row of knots. Repeat on the right side of your work. Tie one more dhhk in the middle of your work.Using the same filler cord tie 4 more dhhks working down and to the right. Repeat on the left side of your work. Use the centre left cord as your working cord and tie 5 reverse dhhks underneath the previous row of knots. Use the current centre left cord as your working cord and tie 4 reverse dhhks underneath the previous row of knots.
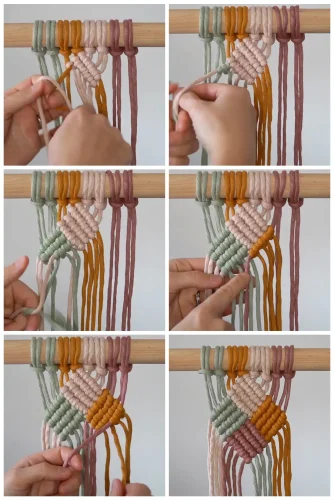
Pattern 2: Diamond Pattern
With this pattern I wanted to show you how you can incorporate add in a little bit of colour using the reverse dhhk. Cut 4 pieces of 5mm recycled vintage green string and 1 piece of 5mm recycled sage string, each piece is 6 ft in length. Fold each piece in half and attach to your dowel using Lark’s Head knots in the order you see here.Use the centre right cord as your working cord and tie 4 reverse dhhks working down and to the right. Use the centre left cord as your filler cord and tie 4 dhhks underneath the previous row of knots. Use the current centre left cord as your filler cord and tie 3 dhhks underneath the previous row of knots.
Tie a square knot around the 4 middle cords.
Use the same filler cord and tie 3 dhhks working down and to the right to create the bottom half of the diamond. Repeat on the right side of your work. Tie one more dhhk with the two middle cords to connect the two sides.
Use the same working cord and tie 4 reverse dhhks underneath the previous row of knots. Repeat on the right side of your work.