Table of Contents
DIY Macrame
DIY Macrame Tutorial – How to Make a Macrame Feather
MACRAME is a type of textile that is characterized by knotting techniques. It is a decorative, functional art that can be made into many different items. The beauty of macramé lies in its versatility, which is why it is a popular choice for gifts. Whether you want to create a beautiful wall hanging or a unique gift, macramé is a great option. Read on to learn more about macrame.
The first step is to choose a cord. Silk cords are a popular choice because they produce beautiful knots, but they are also expensive and can be difficult to find. Other synthetic cords are inexpensive and easy to find and can be dyed, too. Nylon and rayon are silky, but they tend to slip when knotting. To add durability and strength to macrame projects, you can use a combination of natural and synthetic fibres.
The cord and rope used in macrame are similar, but the two are different. A rope is a thicker string that is twisted together. The cord used in macrame is usually made of multiple cords. Some pieces of macrame are simple, while others are elaborate. However, it is important to keep in mind that the material that you use for your project should be strong enough to support the weight of the finished piece.
When macrame is made of a strong material, you can dye it in an interesting way. You can soak the cord in fabric dye for 20 to 40 minutes. The length of time you soak the cord depends on how vibrant or muted you want the result to be. When you’re dyeing macrame, it is important to use a soft material to prevent it from getting soiled. A soft cloth and a gentle hand are essential for success.
Using natural materials will make macrame more durable. You can choose thread that is more durable and choose a nylon cord. If you’re starting with macrame as a hobby, you can purchase patterns and learn from YouTube. You should avoid copying the designs of others. Instead, pick your favourite part of another’s design and use it as a guide for the rest of the project. If you’re ready to make a macrame piece, you can do it yourself.
When you’re new to macrame, you should buy supplies that you will need for the project. A simple piece of string can be used as the base for a macrame creation. If you’re a beginner, you can try to make feathers with a small amount of cord. They’re quick and easy to make, and you can even use them as key chains or purse decor. The finished project will look great wherever you place it.
A macrame feather is a statement piece. You can make this craft with a variety of materials. A thick cotton or burlap will look great, while a thinner burlap will look great on a white wall. There are many uses for macrame feathers, and it can be used for a variety of purposes. The feathers will hang from the ceiling. They are a fun way to decorate a home!
You can use a variety of cords in macrame, from simple to complex. Each cord should have its own function. Some cords are called anchors, while others are used for mounting. A macrame design may use more than one cord. The knotted cords are called anchors and are the ones that are tied in knots. Some people prefer to make their own loops to hang their ornaments. These are a popular choice for unique gifts.
You can use different cords for different purposes. You can use a knotted cord to attach your macrame project. A knotted cord will be shorter than a cord without any knots. A cord that has been used as a belt buckle is called a half square knot. Using a half square knot for your macrame belt is a good choice for beginners. These are versatile and easy to tie. When you’re just learning the ropes, you can also practice making your own hats.
You can also use a cotton rope. It is similar to macrame cord, and often retails for less. Certain fishing and sports retailers sell natural and synthetic cotton rope. They work well for macrame, but yarn will not be as flexible. Using a rope for macrame requires some skill and patience. Once you have mastered the basics, you can expand your skill set. You can make any kind of pattern you like using the same cords that you used to make a necklace.
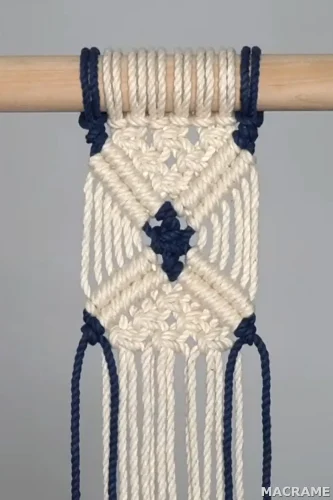
DIY Macrame Tutorial – Macrame Wall Curtain Diamond Pattern
Materials:
– Approx. 90 ft of 4mm Rope (Colour: Bisque)
– Approx. 102 ft of 4mm Rope (Colour: Vintage Peach)
– Approx. 102 ft of 4mm Rope (Colour: Mustard)
– Approx. 120 ft of 4mm Rope (Colour: Sage)
– Approx. 66 ft of 4mm Rope (Colour: Rose Tea)
– Total: 480 ft of 4mm Rope
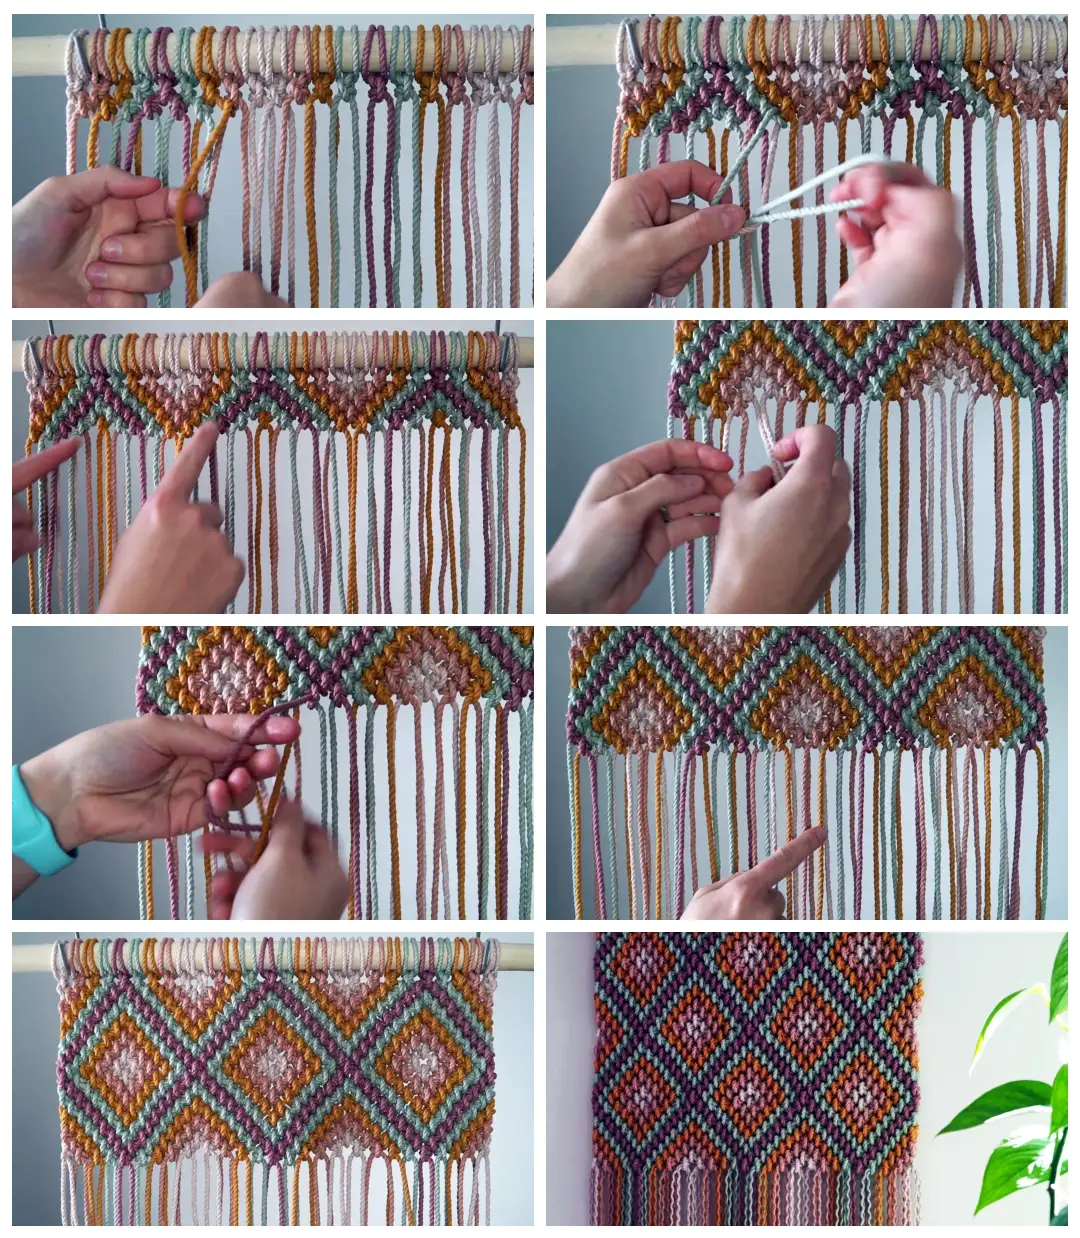
Already familiar with this diamond pattern then you will be well prepared for this tutorial.Let’s get started:
Cut 6 pieces of rope in each of these colours – bisque, vintage peach, mustard and sage. Cut your bisque cords 15 ft in length, vintage peach and mustard 17 ft in length, and sage 20 ft in length. Cut 3 pieces of 4mm rose tea rope, each piece is 22 ft in length.
Attach your cords using cow hitch knots or reverse larks head knots in this order bisque, vintage peach, mustard, sage, rose tea, sage, mustard, vintage peach, bisque. Repeat that two more times to create 3 sections. Here is what it should look like once complete.
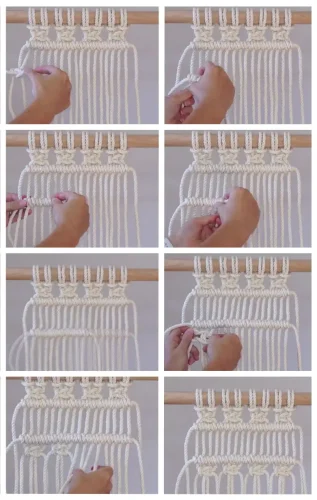
Row 1: Use the right (R) cord as your working cord and tie 4 reverse dhhks. Use the left (L) cord as your working cord and tie 5 reverse dhhks. Repeat two more times across your work (for sections 2 and 3). Here is what it should look like once you have completed row 1.
Row 2: Skip the first cord. Use the R cord as your working cord and tie 4 reverse dhhks. Use the L cord as your working cord and tie 5 reverse dhhks. Repeat for section 2 tying 4 reverse dhhks using the R cord as your working cord then 5 reverse dhhks using the left cord as your working cord. For section 3, repeat but tie 4 instead of 5 knots for second set of knots. Here is what it should look like once complete this row. You can start to see the diamonds forming here.
Row 3: Repeat row 1. As a reminder, use the R cord as your working cord and tie 4 reverse dhhks. Use the L cord as your working cord and tie 5 reverse dhhks. Repeat two more times across your work (for sections 2 and 3). Here is what it should look like once you have completed this row.
Row 4: Repeat row 2. As a reminder, skip the first cord. Use the R cord as your working cord and tie 4 reverse dhhks. Use the L cord as your working cord and tie 5 reverse dhhks. Repeat for section 2. For section 3, repeat but tie 4 instead of 5 knots for the second set of knots. Here is what it should look like once you have completed this row.
Row 5: Repeat row 1. As a reminder, use the R cord as your working cord and tie 4 reverse dhhks. Use the L cord as your working cord and tie 5 reverse dhhks. Repeat two more times across your work (for sections 2 and 3). Here is what it should look like once you have completed this row.
Rows 6-10: Tie 5 more rows (rows 6 – 10) using the exact same process. So for Row 6 repeat row 2, Row 7 repeat row 1, Row 8 repeat row 2, row 9 repeat row 1 and row 10 repeat row 2. Once you have completed these rows you will have created half of the first set of diamonds.
Row 11: Use the L cord as your working cord and tie 5 reverse dhhks. Use the R cord as your working cord and tie 4 reverse dhhks. Repeat two more times across your work (for sections 2 and 3).
Row 12: Skip the first cord. Use the L cord as your working cord and tie 4 reverse dhhks. Use the R cord as your working cord and tie 4 reverse dhhks. For sections 2 and 3, tie 5 knots for the first set of knots, then 4 for the second set of knots.
Rows 13-19: Tie 7 more rows (rows 13-19) repeating rows 11 and 12. For Row 13 repeat row 11, Row 14 repeat row 12, Row 15 repeat row 11, Row 16 repeat row 12, Row 17 repeat row 11, Row 18 repeat row 12, Row 19 repeat row 11.
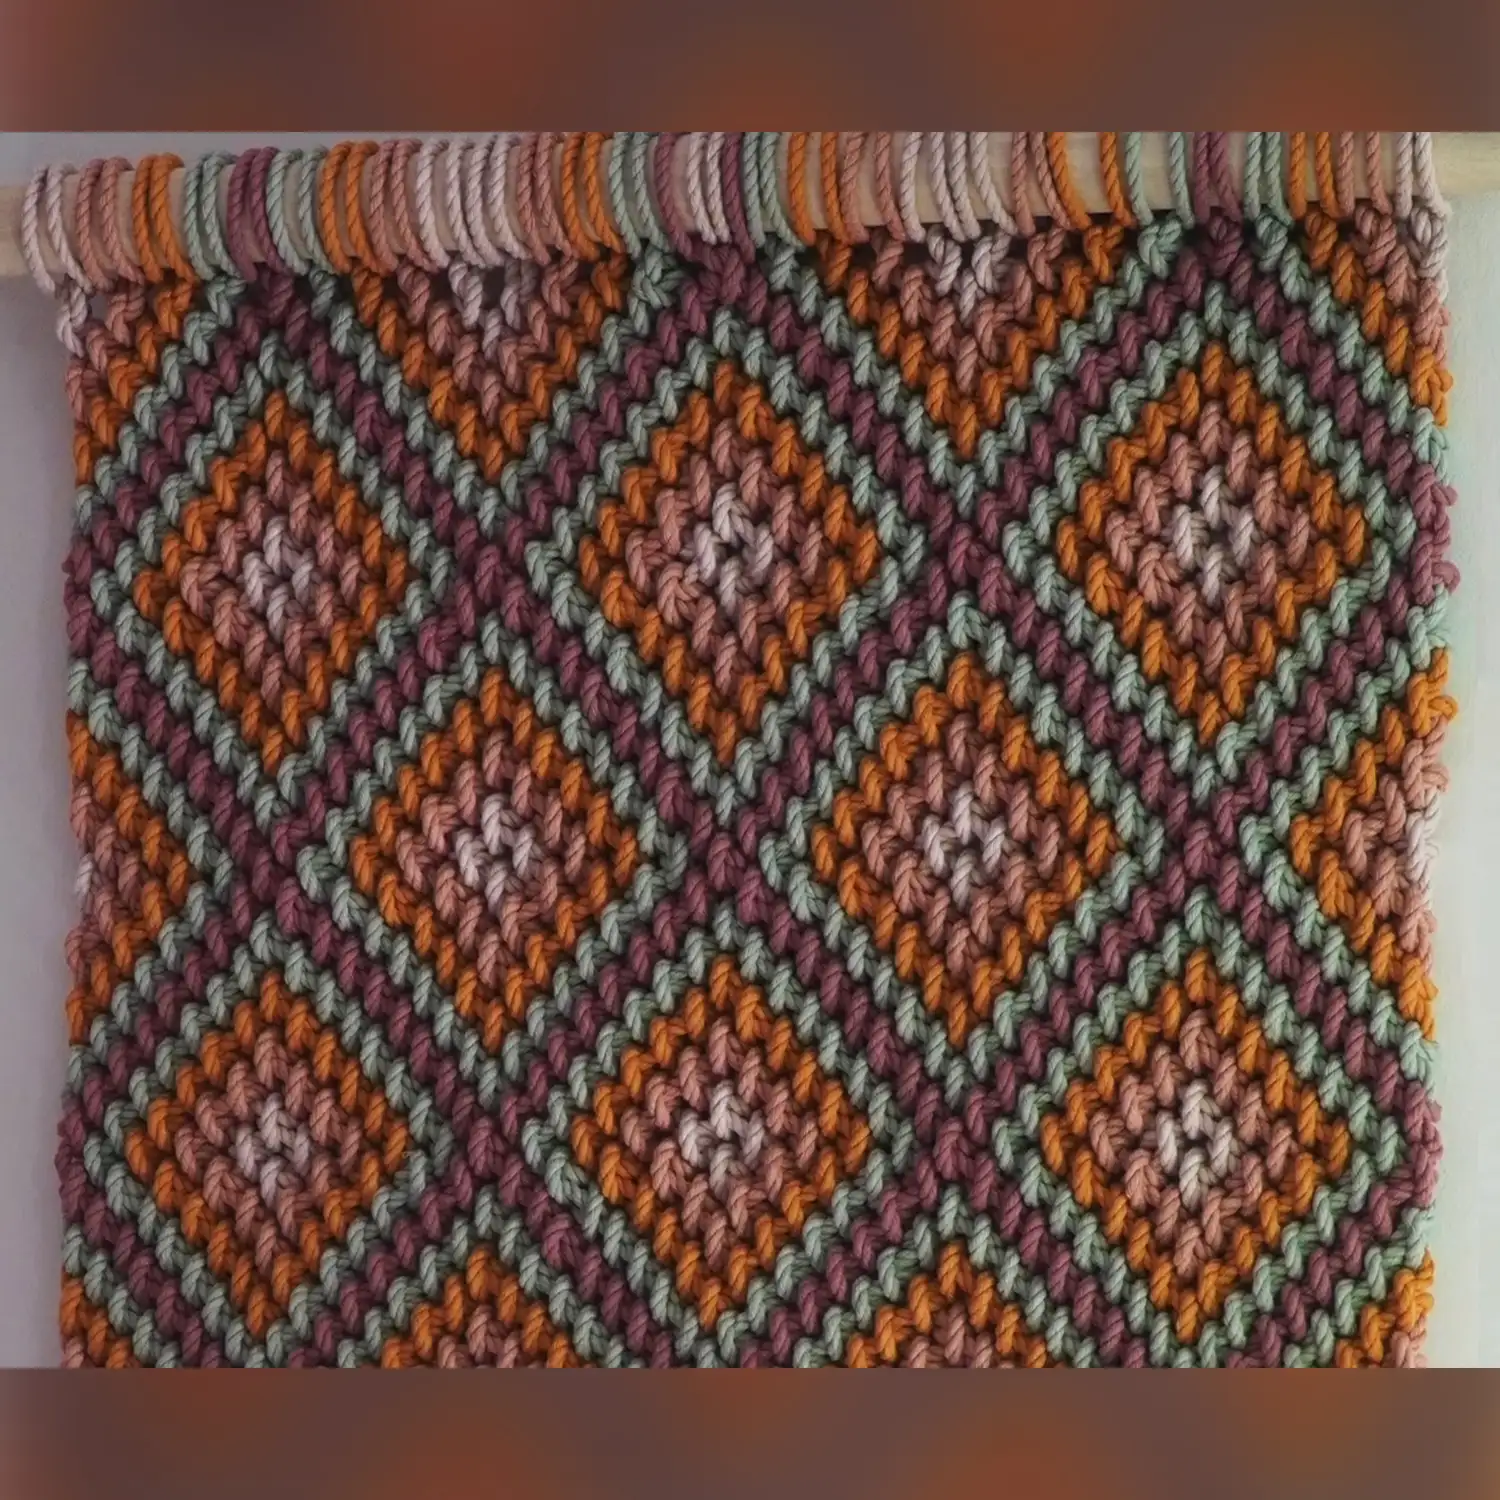
Here is what it should look like once you’ve completed your first set of diamonds. We will tie one more set of diamonds but we want the bottom of this set of diamonds and the top of the next set of diamonds to connect so skip row 1 and repeat rows 2-19 to create a second set of diamonds.
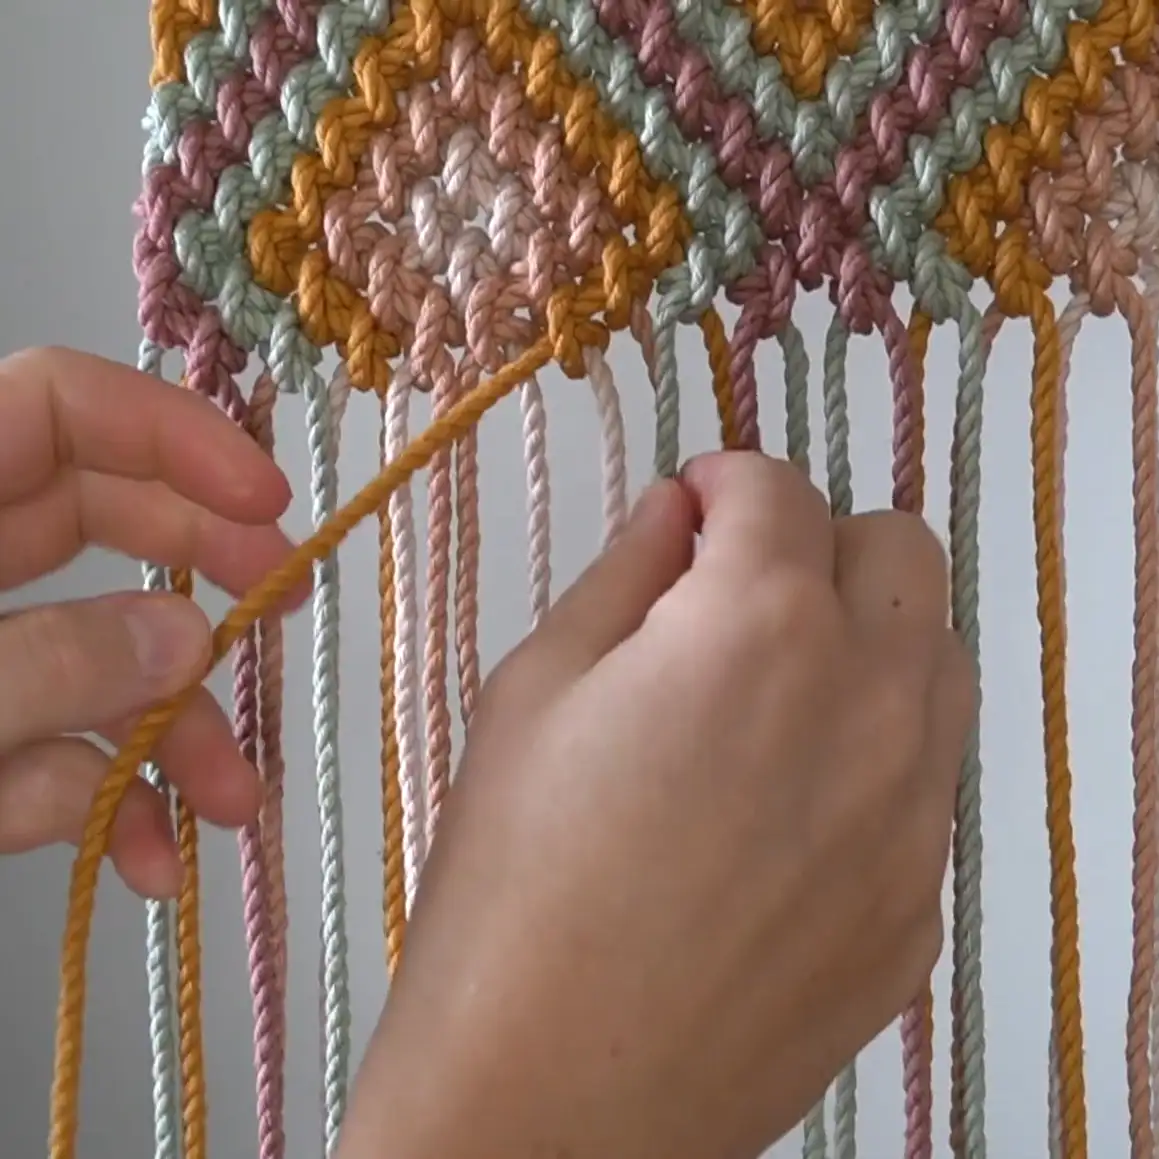
Cut the ends so that they hang approx. 1 ft down from the last row of knots. Untwist to create wavy fringe!